Wednesday, 1 April 2015

Happy Blog 1st Birthday Giveaway

Happy Blog-day to me,
Happy Blog-day to me, 
Happy Blog-day emerald cottaaaaage
Happy Blog-day to me :)


Yes, its a whole year since I started my blog, wow! I can't believe I've actually managed to keep going this long :) Thankyou to everyone who's been reading and/or commenting for a while, and welcome to my new readers too. Its definitely the bloggy love that keeps me coming back to post more. The community of like-minded bloggers is not something I had considered, so blogging fellowship has been a really lovely happy surprise :) I wondered if I would have much to say, if I would get bored, or if anyone would bother to read my waffle. Well, I'm definitely not bored yet, and it would appear that you lot are happy to still be reading, so I count that as a success :)

Stay tuned to the end of this post for the details of a celebratory Giveaway :) Yes! Another one! This time you can win this crochet book, along with some yarn and a hook to make some hooky flowers :)
Hurray :)


I didn't do any kind of end-of-year or 100-post roundup, so I think my 1st year blogiversary seems like an opportune time to reflect back on what's happened, craft-wise, in the emerald cottage over the last 12 months. Take a deep breath and let's dive head first into a year of craft .....

There have been scarves and cowls ....


.... and cowls and scarves ....


.... and cosy mitts ....


Lots of dinky little bags ....


.... and happy bunting ....


Cuddly baby blankets ....


.... and cushions and cosies for home ....


Some crochet creatures ....


.... and Christmassy craft ....


Lots of crochet mini-makes ....


.... and loooooads of non-crochet makes too ....


My goodness! Did I really manage all that lot in a year ??!? You know, it's funny. I am my own harshest critic. I read other blogs, adore other people's creations and sigh with frustration - how much everyone makes! How lovely it all is! How much time I must waste! I ought to get more done! Well, maybe I am not wasting time and maybe I am getting plenty done :) It's been lovely to look back at photos of all these fun projects, and to think about where I made them (at home, on holidays, in the park, on the school run) and who they were for (my Little People, friends, family). To remember the workshops I attended (felting, fused glass, candlemaking) and the friends who came along for the ride! How lucky am I to be able to do all these fun things and then to share them with you.

So in the spirit of this sharing, let's get down to the business of the GiVeAwAy :) I know the last giveaway was quite recent (and I may or may not have got round to posting prizes yet - ho-hum ....) but it doesn't bother me and hopefully doesn't bother you either :) 
Anyway, I recently bought myself a new crochet book (and I do love a good crochet book) "Cute and Easy Crochet with Flowers" by Nicki Trench. It's so lovely, packed full of patterns for flowers to crochet, and imaginative ideas of how to use them. I have 2 extra copies to give away, and so there are two prizes, each comprising a book, some yarn and a hook. Here's that photo again ....


The rules are simple - to enter just leave a comment below, and please include your contact details - purely so I can contact you in the event that you win, I'm not going to start spamming you or anything. The giveaway closes at midnight UK-time on Easter Sunday, that's Sunday 5th April, after which time 2 winners names will be chosen at random (probably with the assistance of a small person). I should point out this is not a sponsored post or anything fancy like that, I just liked the book (ok I confess it was on offer on amazon) and I wanted a lovely prize for my lovely readers.

So what are you waiting for ?! Get commenting, and best of luck!

xxxxxxxxxxxxxxxxx

ps The actual blog-i-versary was actuallly on Saturday but I've had millions of annoying technical problemettes (the details of which I will not bore you with) but suffice it to say I feel like I have written, rewritten and proof-read this post about 365 (do you see what I did there) times so apologies if it is full of mistakes, I just can't see it properly anymore!

Thursday, 26 March 2015

This week

This week I've been mostly ....

.... loving that my Mother's Day flowers still look gorgeous


.... snuggling under blankets with various under-the-weather Little People


.... enjoying daffodils in my new-to-me 50p bargain charity shop vase


.... crocheting things with my Gillymakes win of Sugar n Cream cotton yarn


.... admiring the pieces I made on my fused glass workshop


.... flicking through my new-to-me craft books - another charity shop find, all 4 for £12 :)


.... loving the latest McDonalds Shawn the Sheep Happy Meal toys (yes I know its unhealthy)


.... ironing Hama bead creations


.... packaging up (finally) my blog giveaway prizes


.... playing with colours for a new blanket :)


What have you been doing this week ?

xxxxxxxxxxxxxxxxxxxxxxx

ps rubbish photos, sorry - all taken on my iPad, just couldn't be bothered faffing about with memory cards etc!

Tuesday, 17 March 2015

St Patrick's Day


People from Ireland are the people who least celebrate St Parick's Day, at least in Northern Ireland, and at least when I lived there. I do seem to remember that we got the afternoon off school to watch some inter-school rugby final, but other than that I don't remember celebrating it in any way. Of course that may have changed now what with the internet an' all. I know that our cousins across the pond go a bit mad for St Patrick's Day, and certainly in England it's a day of (albeit minor) note. Usually I will wear a green top or scarf and perhaps have some soda bread or Guinness, but this year I didn't even do that. My (English) friend ran up to me in Sainsbury's earlier, gave me a massive hug, and shrieked "Happy St Patrick's Day !!! Bless her, it was very sweet :)

Little Miss had to "bring something from Ireland" to Brownies tonight. I said "bring me, I'm something from Ireland" but thankfully she took it as the joke it was intended and did not make me accompany her. Instead, after scouring Pinterest, I made her a little leprechaun hat fascinator-come-headband to wear. The pin sent me to a ravelry pattern here (http://www.ravelry.com/patterns/library/st-patricks-day-fascinator), so big thankyou to Helen Whiteley for making it available :)

I made 90% of it waiting for Little Man to come out of the school, and the last bit while I was making dinner. A bit of a rush but here's how it turned out ....


<.... and here's the Brownie herself modelling it :)


The photos are rubbish, sorry. It was 5.50pm. I had to finish drying her hair, fish her top out from the tumble drier, get her to finish her dinner, and finish the headband thingy and get to Brownies for 6pm, so no time for decent pics. She was late, yes. Oops.

Now everyone knows that you can't just go on Pinterest, find a pattern, and leave. That would be most rude. Naturally you have to spend loads of time browsing other stuff but usually not making anything else. Today though I decided to capitalise on the St Patrick's Day spirit and make a little wreath too. I gathered some bits and pieces ....


The little inconspicuous pink and white plasticy thing on the left is a pom-pom maker. Have you ever used one ? They are great fun. Much easier than getting all cross with cardboard. Here's a quick lesson in pom-pom making.

1. Get your pom-pom maker ready - it starts off like this (this is my slightly bigger one),


Both sides have 2 foldy-out arm things.


2. Make sure the arms on one side are folded in, and that the 2 on the other side are folded out. It's the two that are folded out that we will use first.


3. Start wrapping your wool round the arches of the folded out arms. Just keep going round and round, over and over, with an even distribution, until there is only a small space left at the centre.


4. Now fold that side away, and fold out the other side. Start wrapping again.


5.  Once the second side is wrapped, fold it away too. Then use a pair of sharp scissors to cut all the way round both sides.


6. At this point you can see the beginnings of a pom-pom :)


7. Tie a length of yarn round the middle to catch all the pom-pom strands together. Make sure it's nice and tight, do it a couple of times to be sure.

8. Now for the fun part! Open out the foldy-out arm things on both sides, then separate the white flat front and back from each other (they are held together by a pin and come apart fairly easily). Ruffle it up and ta-daaaa - a lovely squishy pom-pom :)


Back to the wreath. I used some green fabric - leftover from an old book-rack thing that bit the dust - the fabric formed pockets for the books to lay in. I cut the fabric into strips, wound it around the wreath and pinned the ends in place.


The pom-poms were also pinned in place ....


.... I had some green felt that I cut into 4 little square-heart shapes ....


 .... and gathered then together into a sort of shamrock ....


... and pinned with some ribbon to the top of my wreath ....


.... and here it is, a really simple St Patrick's Day wreath ....


Happy St Patrick's Day :)

Jill
xxxxxxxxxxxx

Thursday, 12 March 2015

Spring vase cosies


Today was a semi-enforced day of rest - I spent 3 hours yesterday attacking the pyracantha along the side of our house with some secateurs. It was extremely therapeutic as the sun was shining and it wasn't cold, and it was also very sociable - I chatted to a grand total of 9 neighbours, plus the postman, and a window cleaner. I love where we live, I really do :)


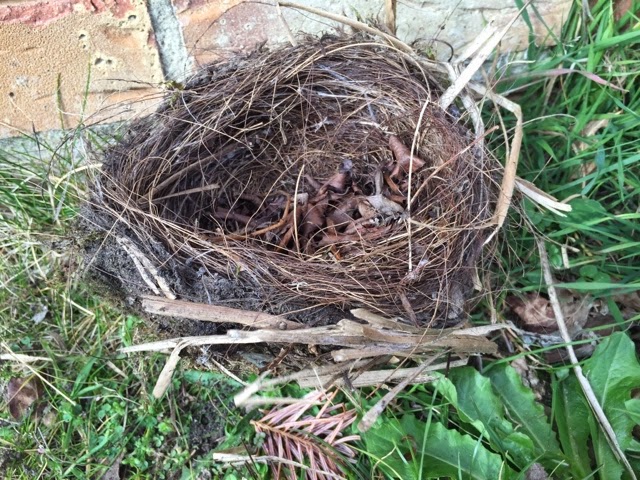
I found an abandoned bird's nest in the thick of things. I've taken it out so I could show the Little Peeps, and I'm going to see if school would like to have it for nature lessons or something. I hope it was okay to move it. It was sort of on its side already, and there was no evidence of eggs, or baby birds in residence, or any birds at all. I'm really hoping I haven't committed a massive ecological faux-pas. Anyway, this was the end result of my hard labour - a large pile of thorny detritus (still to be bagged up for recycling - groan) and baldy looking shrubs.


I ended up with one very shredded arm, and about a thousand splintery-thorn wounds. Some with bits left in them. I'm currently sporting plasters on 4 of my fingers. And that was with gloves on. Crap gloves, obviously. My hands, arms and shoulders were agony today, all muscle aches, scratches and the aforementioned thorny splintery bits, so I had a very decadent duvet day. I watched the last three "Call The Midwife"s (Call the Midwives ??) back-to-back and drank about 20 cups of tea. And I had a great time working on a fun little project. Despite the finger injuries.


At the start of the week I'd seen this post (http://pinkmilkjewels.blogspot.co.uk/2015/03/this-weeks-news.html)by Heather of Pink Milk. Do go and pay Heather a visit, her blog is gorgeous. Heather had a picture of daffodils in groups of 4 or 5 in sweet little bottles, not dissimilar to the ones we used to get school milk in (eurgh - warm milk that had been sitting by the radiator too long anyone ??), and also not dissimilar to the ones I keep from when I splash out in the summer on Starbucks chilled coffee drinks from the supermarket (delicious but v expensive as I can drink them in one big gulp - yum). Just before reading Heather's post I'd bought some daffodils, and now I knew just what I wanted to do with them.

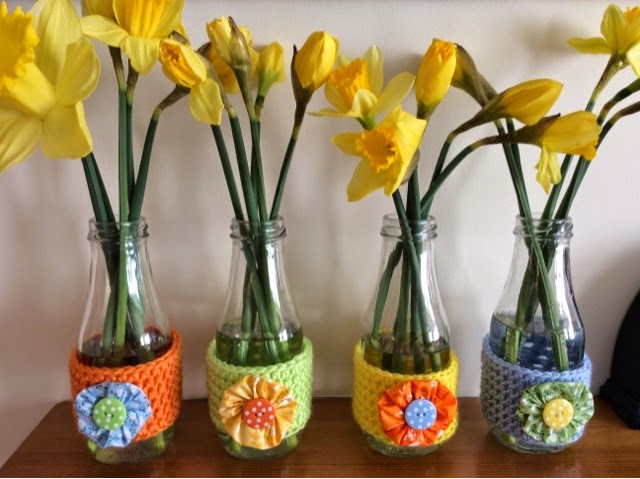
So today, shredded fingers and all, I decided to bling up my Starbucks bottles and steal Heather's idea (thanks Heather :). I crocheted some little teeny weeny vase cosies, more like vase bands really. I wanted to tart them up a bit and decided on some little fabric yo-yo's, and buttons, in contrasting colours.


Have you ever made a fabric yo-yo ? It's easy, and as I am a lazy-short-cutter, I'll share my super easy method with you.
(By the way making fabric yo-yos is an excellent children's first "proper" sewing project as they are really quick, easy and versatile :)

A fabric yo-yo is a little circular 3D puff of fabric. You will need:
- fabric (well, duh)
- pencil or pen or chalk
- scissors
- sewing needle
- thread
- something circular to draw round


Before we start, a few notes:
- I wanted to make yo-yo's of 4cm in diameter, but you can use the same idea for any size, just change your fabric circle size accordingly.
- use any old round thing for your template - a lid, cup, glass, bracelet, roll of tape, anything. I used the lid of the tub I keep my pins in.
- your circle template needs to be twice the diamater of the yo-yo you want to end up with.
I wanted my yo-yo's to be about 4cm in diameter so my template was about 8cm in diameter. In the picture below you can see a green yo yo that started off as a circle the same size as the yellow circle, so they really do shrink.


Let's get on with making a yo-yo shall we ....
1. Place your template on your fabric and draw it round with pencil or pen. You won't see this on the finished yo-yo edge so it doesn't matter if the pen is fadeable or not. I just used a pencil. Yes, that is a Disney Princess on my pencil. Its not mine, honest.

2. Cut out your fabric circle.

3. Turn your fabric circle wrong side up, and using your needle (obviously), join your thread to your fabric circle with a knot or a few weeny stiches over each other, either is fine, a few mm from the edge. I find weeny stitches easier than knotting a fiddly piece of thread. The old eye-sight isnt what it used to be. Or maybe my arms aren't long enough ;)


4. Sew a running stitch all around the edge of the circle, staying a few mm in from the edge. Don't worry about precision. Fancy yo-yo sew-ers will at this point turn a neat little hem and use the running stitch to secure it as they go, but as I will be putting a button in the center of my yo-yos, I don't care about the raw edge (what a rebel) so - no hemming. See, super easy.


5. When you are back round at the start of your circle DO NOT FASTEN OFF. Pull the thread so it starts to gather the circle in on itself. Sort of fiddle around easing the gathers evenly until you have pulled the circle in as tight as it will go. The bigger your running stitches were, the tighter you can get it: bigger stitches means fewer parts of the fabric pulled into the centre means less bulk of fabric in the centre means tighter bunching. Comprende?


6. Holding the gathers in place, use your needle and thread to do a few wee stitches to secure it, then attach your button, using the same thread: that's why we didn't fasten off.

You can choose which side of the yo-yo to attach the button to. If you choose the side where you can see the gathered hole (the left-hand yo-yo above), you will see all the bunching and gathering, and its quite a nice effect. If you prefer the smoother look of the other side, just attach the button to that side. Simples! Ok, but STILL DONT FASTEN OFF!


7. Now you have a button attached to your yo-yo, you can attach your yo-yo to whatever it's going to decorate. In our case, vase sleeves. You can use yo-yos for loads of things - clothing, bags, cushions, wall art, endless yo-yo fun :)
You didn't fasten off (I hope not, I told you not to ....) so you can use the same thread to now attach the button decorated yo-yo to the crocheted sleeve (or whatever).


And that's all there is to it - mini ta-daaa - some spring vase cosies, cheery or what :)


I rather suspect that I have turned the making of the most simplest thing in the world into a set of instructions with more words in that most people say in a week, but hey that's why you love me, right ?

xxxxxx